


Post by Zaxinou on Jul 12, 2011 20:10:03 GMT 10
PR given by Corez
Some pretty old articles I wrote for the magazine at ProVision, hope you guys learn something from them.
Some pretty old articles I wrote for the magazine at ProVision, hope you guys learn something from them.

This month's hint is a little feature that I find quite handy when it comes to make flashy mini-banners. It's the Animation feature available in Photoshop (available in CS3 and CS2, I don't know if it's available in CS; it's not available in version 7, I think).
Okay, first off make a new document; choose any size. I'm going with 88x31 (the basic mini-banner size). Make a new layer. Choose the Text Tool and add some random text to that layer.

Now, go to the menu bar where 'File', 'Filter' etc. is located and click on the 'Window' menu option. Search for the 'Animation' option. If you did everything correctly, a new window should open, probably on the bottom left.
Okay, now make that same layer you added invisible by clicking on the eye icon next to the layer ( ). Time to make things animated; click on this (
 ) icon located in the Animation window. A new layer in that window has been made. Make the invisible layer (the layer with text, remember?), visible again. Click on the triangular play button (
 ) and then there you have it, animation! One problem: this might give some people a seizure, so we'll need to fix it.
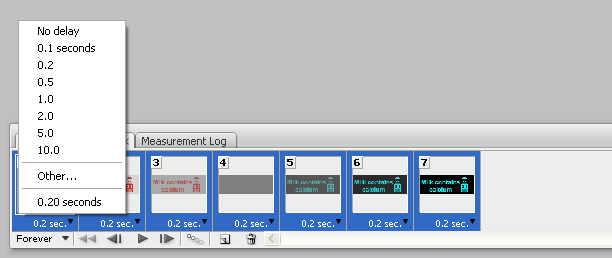
First thing, click on the first layer in the Animation window. Then you need to click on this icon ( ). A small window will pop-up, just click OK. This'll add a couple of layers. Now select all the layers, and then right click on the '0 sec.' text, choose either 0.1 seconds or 0.2 seconds (optional). Click on the play button again and there you have it, your very own animated mini-banner!
Here's mine:
Just keep playing around with the Animation window and you'll make some pretty nifty things soon. Questions? PM me!
(To save the file in order to keep it animated: Click on the first layer from the animation window; go to File>Save for Web. Choose GIF from the drop-down and then you just click Save).
Okay, first off make a new document; choose any size. I'm going with 88x31 (the basic mini-banner size). Make a new layer. Choose the Text Tool and add some random text to that layer.
Now, go to the menu bar where 'File', 'Filter' etc. is located and click on the 'Window' menu option. Search for the 'Animation' option. If you did everything correctly, a new window should open, probably on the bottom left.
Okay, now make that same layer you added invisible by clicking on the eye icon next to the layer (
). Time to make things animated; click on this ( ) icon located in the Animation window. A new layer in that window has been made. Make the invisible layer (the layer with text, remember?), visible again. Click on the triangular play button ( ) and then there you have it, animation! One problem: this might give some people a seizure, so we'll need to fix it.First thing, click on the first layer in the Animation window. Then you need to click on this icon (
). A small window will pop-up, just click OK. This'll add a couple of layers. Now select all the layers, and then right click on the '0 sec.' text, choose either 0.1 seconds or 0.2 seconds (optional). Click on the play button again and there you have it, your very own animated mini-banner!Here's mine:
Just keep playing around with the Animation window and you'll make some pretty nifty things soon. Questions? PM me!

(To save the file in order to keep it animated: Click on the first layer from the animation window; go to File>Save for Web. Choose GIF from the drop-down and then you just click Save).